
- 1 Install and upgrade
- 1.1 System Requirements
- 1.2 Source Code Installation
- 1.3 One-Click Installation for Windows
- 1.4 Zsite, ZenTao and Zdoo
- 1.5 Install Zsite with online scripts
- 1.6 Upgrade Zsite
- 1.7 Upgrade Zsite with online scripts
- 1.8 Zsite Themes
- 1.9 Decryption
- 2 About Zsite
- 3 How to use Zsite
- 3.1 Content
- 3.1.1 Article
- 3.1.1.1 Article Category
- 3.1.1.2 Publish an Article
- 3.1.1.3 Edit, Delete and Attach
- 3.1.2 Page
- 3.1.2.1 Zsite Page
- 3.1.3 Blog
- 3.1.3.1 Zsite blog
- 3.1.4 Book
- 3.1.4.1 Add a book
- 3.1.4.2 Add chapters to a book
- 3.1.4.3 Write articles for a chapter
- 3.1.4.4 Book settings
- 3.1.5 Submission
- 3.1.5.1 Submit an article
- 3.2 Mall
- 3.2.1 Orders and Settings
- 3.2.2 Product
- 3.2.2.1 Product category
- 3.2.2.2 Add a product: basic info
- 3.2.2.3 Add a product: attributions
- 3.2.2.4 Add a product: images
- 3.3 User
- 3.3.1 User Management
- 3.3.1.1 User list
- 3.3.2 Comment
- 3.3.2.1 Review and reply a comment
- 3.3.3 Forum
- 3.3.3.1 Board settings
- 3.3.3.2 Board moderator and descriptions
- 3.3.3.3 Edit, delete, reply and stick a thread
- 3.4 SEO
- 3.4.1 Traffic Statistics
- 3.4.2 Keywords
- 3.4.3 Links
- 3.5 UI
- 3.5.1 Interface
- 3.5.1.1 Theme
- 3.5.1.2 Layout
- 3.5.1.3 Appearance
- 3.5.1.4 Code
- 3.5.1.5 Source
- 3.5.1.6 Mobile site
- 3.5.2 Logo
- 3.5.2.1 Site logo
- 3.5.2.2 Site favicon
- 3.5.3 Slides
- 3.5.4 Navigation
- 3.5.5 Widget
- 3.5.5.1 Manage a widget
- 3.5.5.2 Example: customized widget
- 3.5.5.3 Example: use Widget to set the style
- 3.5.6 Visual Editor
- 3.5.7 Other Settings
- 3.5.8 Custom Themes
- 3.6 Ext
- 3.6.1 Extensions and Themes
- 3.6.2 Import JS
- 3.7 Set
- 3.7.1 Site
- 3.7.1.1 Basic settings
- 3.7.1.2 Language
- 3.7.1.3 Path
- 3.7.1.4 Domain settings
- 3.7.1.5 CND settings
- 3.7.1.6 Cache settings
- 3.7.1.7 Homepage menu
- 3.7.1.8 Full text retrieval
- 3.7.1.9 Backup/Restore
- 3.7.1.10 Agreement
- 3.7.1.11 Static Settings
- 3.7.2 Company
- 3.7.2.1 Company Information
- 3.7.2.2 Contact
- 3.7.3 Points
- 3.7.4 API
- 3.7.4.1 Email Setting
- 3.7.4.2 OAuth
- 3.7.5 Security
- 3.7.5.1 Basic settings
- 3.7.5.2 Filters and Blacklist/Whitelist
- 3.7.5.3 Sensitive words and attachment
- 3.7.5.4 Verification Code
- 3.7.5.5 Admin and Privileges
- 4 System Maintenance
- 4.1 Configure web server for URL
- 4.2 Backup Zsite
- 4.3 Install Zend Guard Loader
- 4.4 Install Ioncube
- 4.5 Install other PHP extensions
- 4.5.1 Install PHP-openssl
- 4.5.2 Install PHP-curl
- 4.5.3 Install PHP-json
- 4.5.4 Install PHP-mbstring
- 4.5.5 Install PHP-gd
- 4.5.6 Install PDO
- 5 Customization
- 5.1 Before you start
- 5.2 Zsite source code
- 5.3 Zsite directory structure
- 5.4 Find the code to modify
- 5.5 Database structure
- 6 Zsite Cloud
Article Category
- 2016-08-25 11:14:30
- tengfei
- 15157
- Last edited by Zeze on 2018-08-02 10:21:32
Content management is a must-have feature in a website builder, so Zsite has one. Before adding any content to your website, add categories of articles first.
1. Login Zsite backend
Login Zsite as Admin. For example, http://192.168.1.99/admin.php.
2. Manage categories
Click CMS-> Article , and all articles will show in the right column.
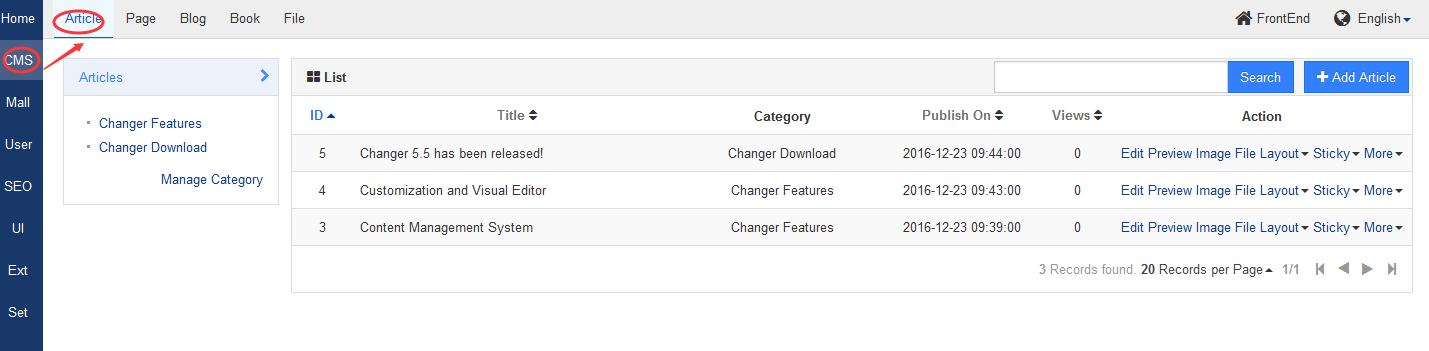
Click Manage Category and you can set names, alias, and child categories.

Note
- A category can have the alias(no hyphens) for SEO.
- Five categories can be added at one time. If you want to add more than five categories, save the first five and add the rest of them.
3. Maintain a child category
You can add as many child categories as you like. Choose a category, click Child.
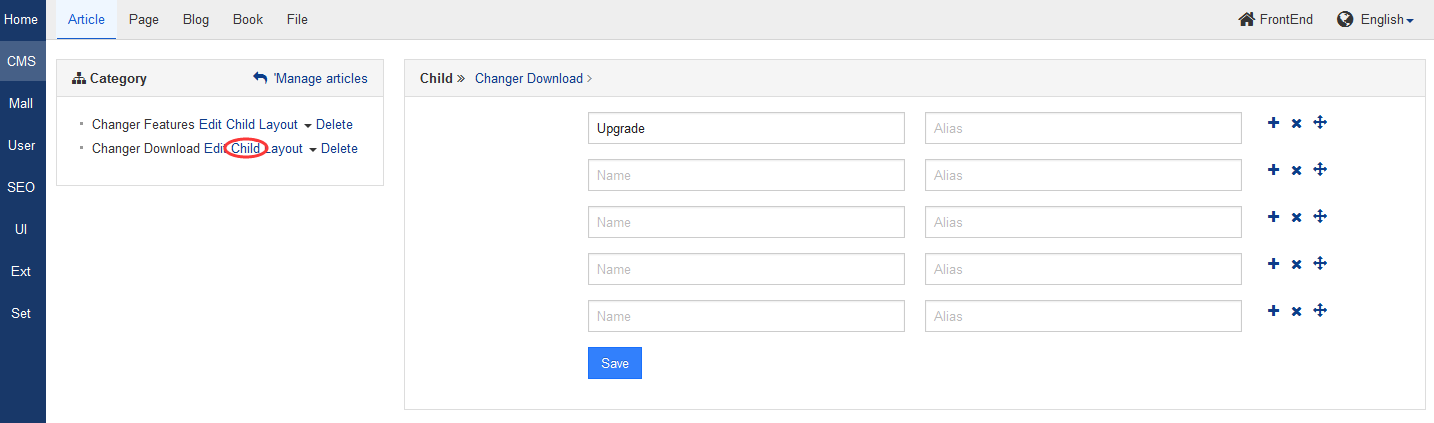
4. Set the layout of a category separately
Each category is a list of content. You can set the layout for each category in Zsite.
SCREENSHOT
-
CUSTOMERS
Haier Vanke Skyworth China Mobile -
PRODUCTS
ZenTao ZDOO ZenTao Cloud -
SUPPORT
GitHub SourceForge Dynamic Download -
CONTACT US
Email: Renee@easysoft.ltd Skype: tengfei@cnezsoft.com


